

Getting Started
Welcome to the Gateway documentation!
A detailed technical description of the interface can be found in our API Reference documentation - but you should read the Transaction Process chapter first to understand what the different requests are used for.
In case you want to accept card payments, you may want to integrate our payment.js Library for seamless user experience.
Transaction Process
Javascript Integration with payment.js
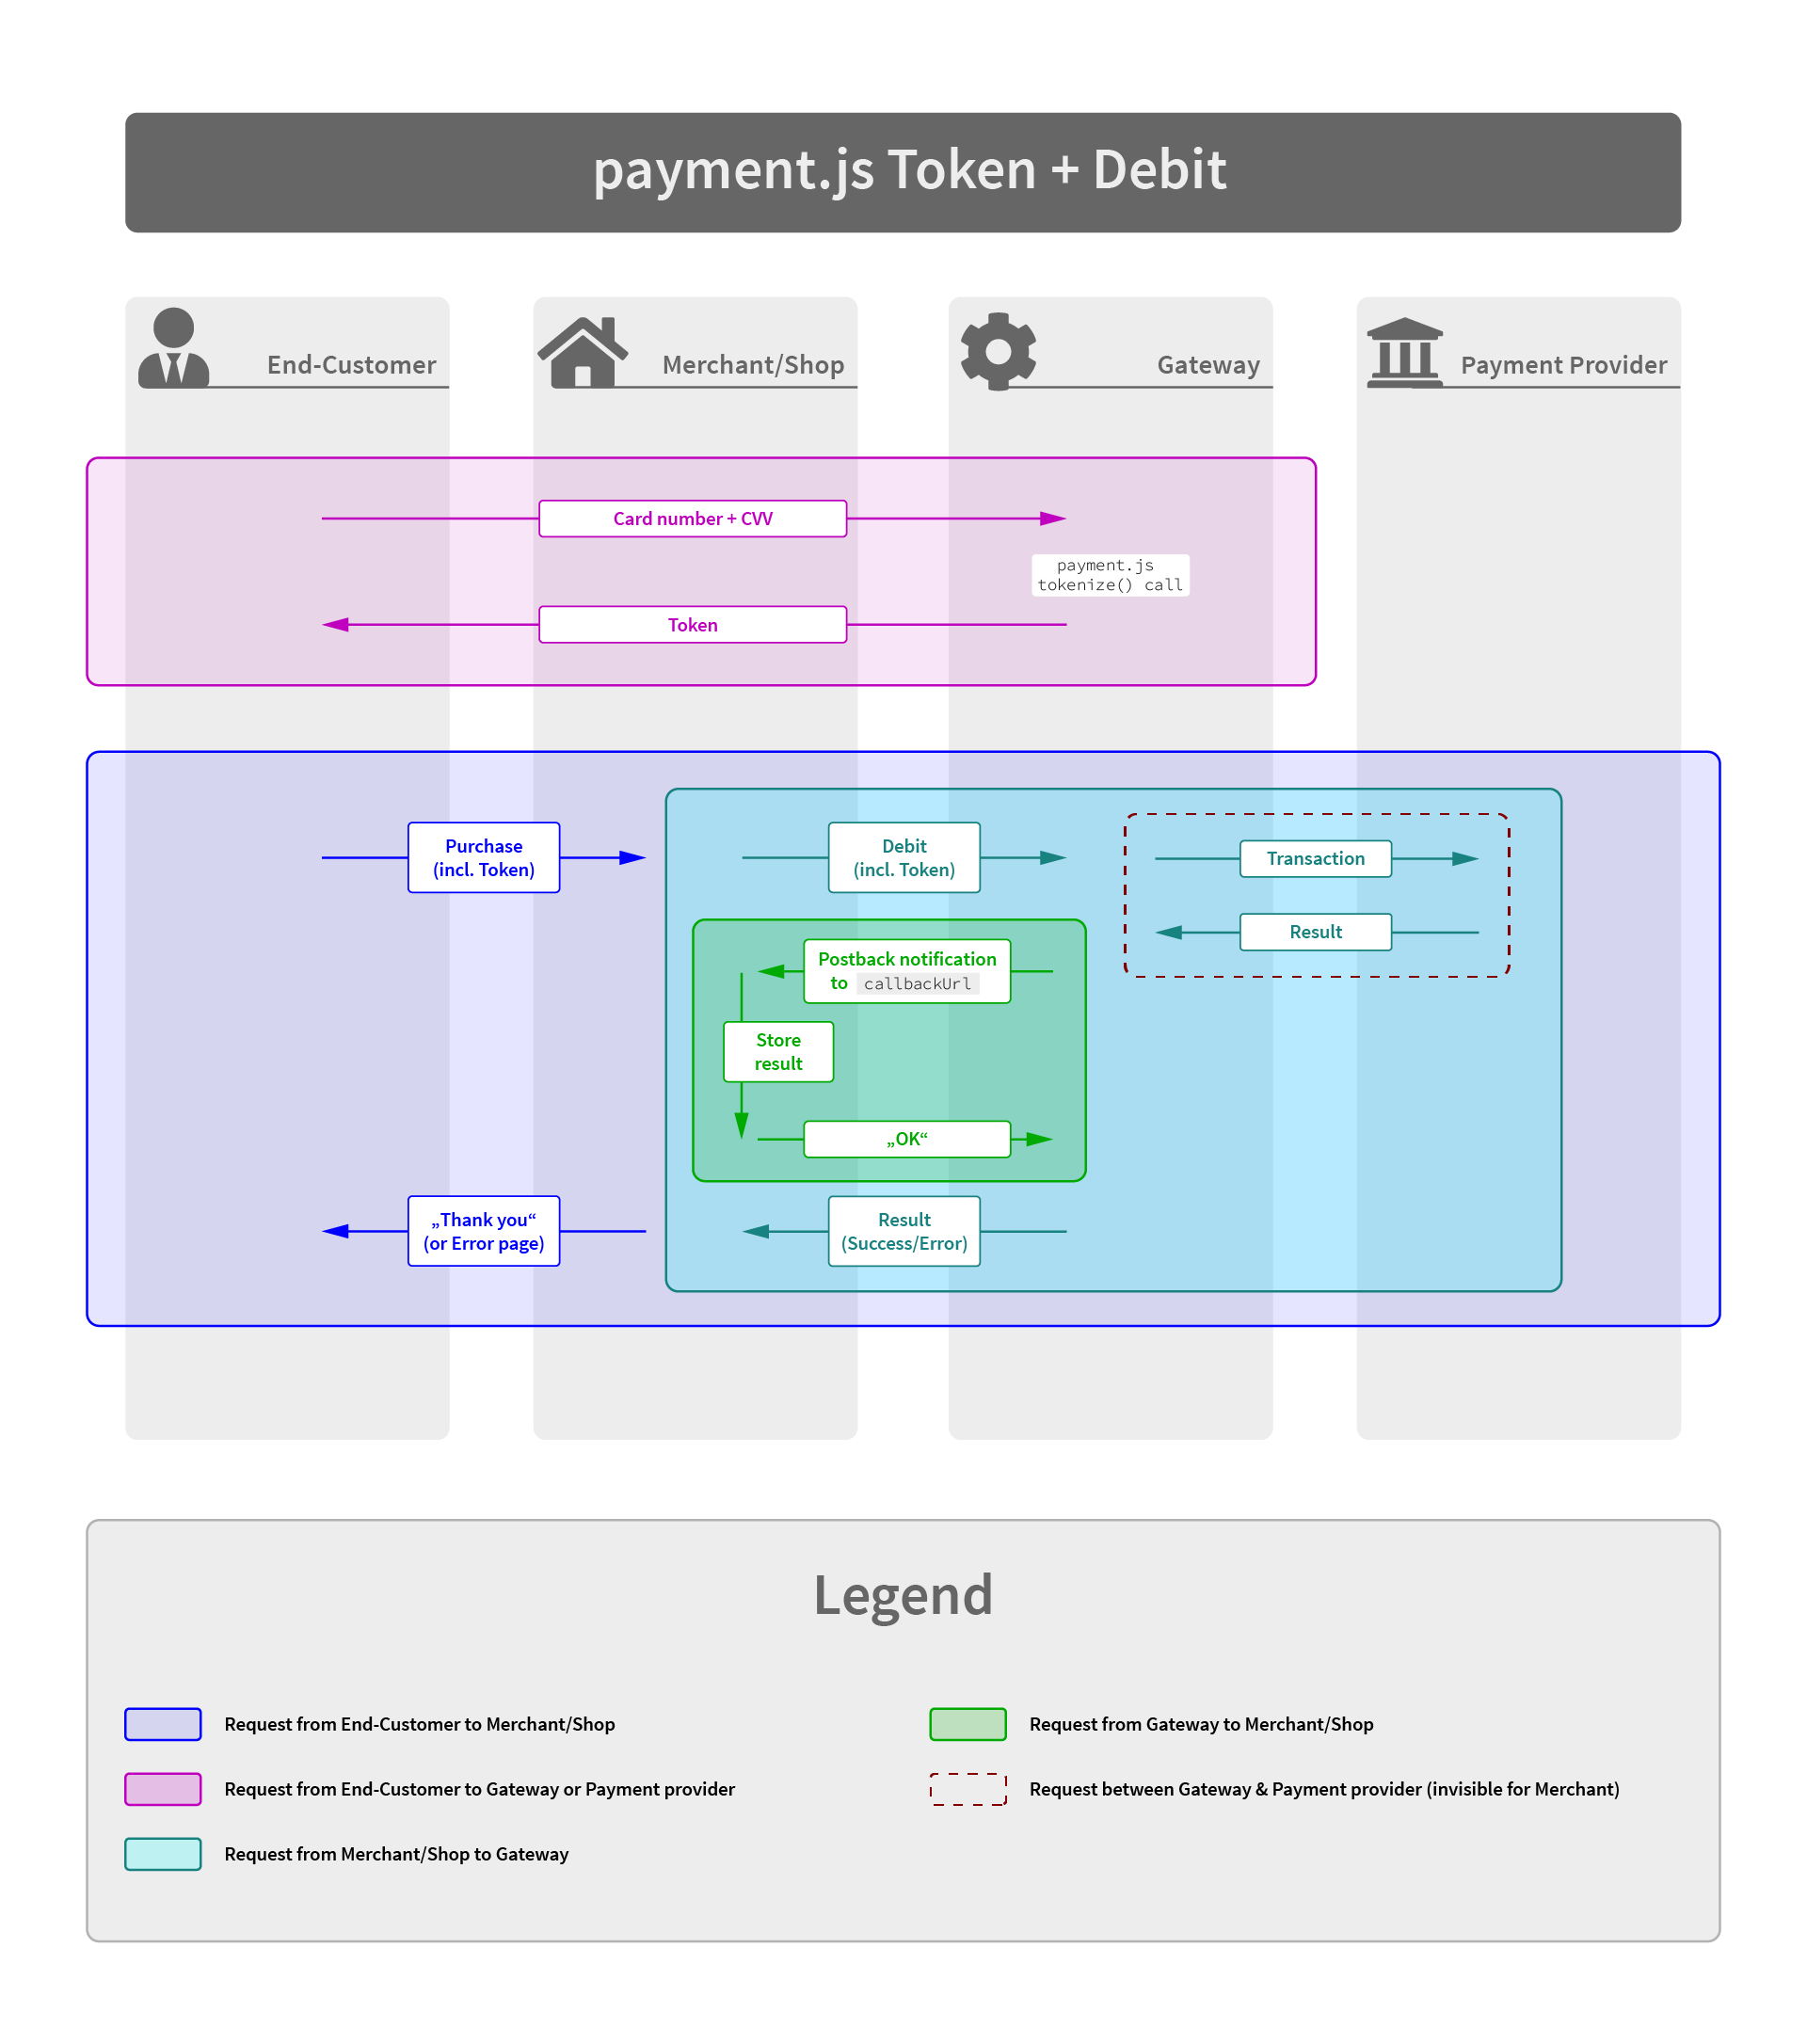
For most card payments you're encouraged to integrate our payment.js Javascript Library. Using this approach most of the payment form will be served from your checkout page - which gives you full flexibility for styling and design. Only the sensitive fields for card number and CVV code are rendered within small iFrames served by our PCI-compliant infrastructure.
- Embed the payment.js library and initiate it as described in payment.js Javascript Integration
- Once you retrieved the payment token from the Javascript
tokenizecallback you submit your part of the payment form to your backend - Initiate the payment with the appropriate API call, passing the token in the field
transactionToken - The transaction gets processed immediately and the Gateway sends you an asynchronous Postback Notification to the URL you provided in the initial API call
- The Gateway answers your request containing the result. Depending on the transaction status this result
will usually be
FINISHED,PENDINGorERROR.
Transaction Types
The Gateway knows the following transactions types. Note: Depending on the connector some transaction types may not be available/supported.
- Debit: a "normal" payment. Debits the end customer with the given amount.
- Refund: Reverses a payment which was previously performed with a Debit Transaction
Recurring Transactions
For recurring transaction you have to set the withRegister flag on the first transaction.
By doing this the gateway and the payment provider will accept further payments with reference to the first one.
For the recurring Debit call you must set the referenceUuid with the UUID of the first transaction.
Each transaction returns a unique ID ("UUID") which you should store within your database, as you may need it for further transactions.
API Call
Now that you know which kind of transaction there are, you are encouraged to continue reading the API Reference Documentation
Asynchronous status notification
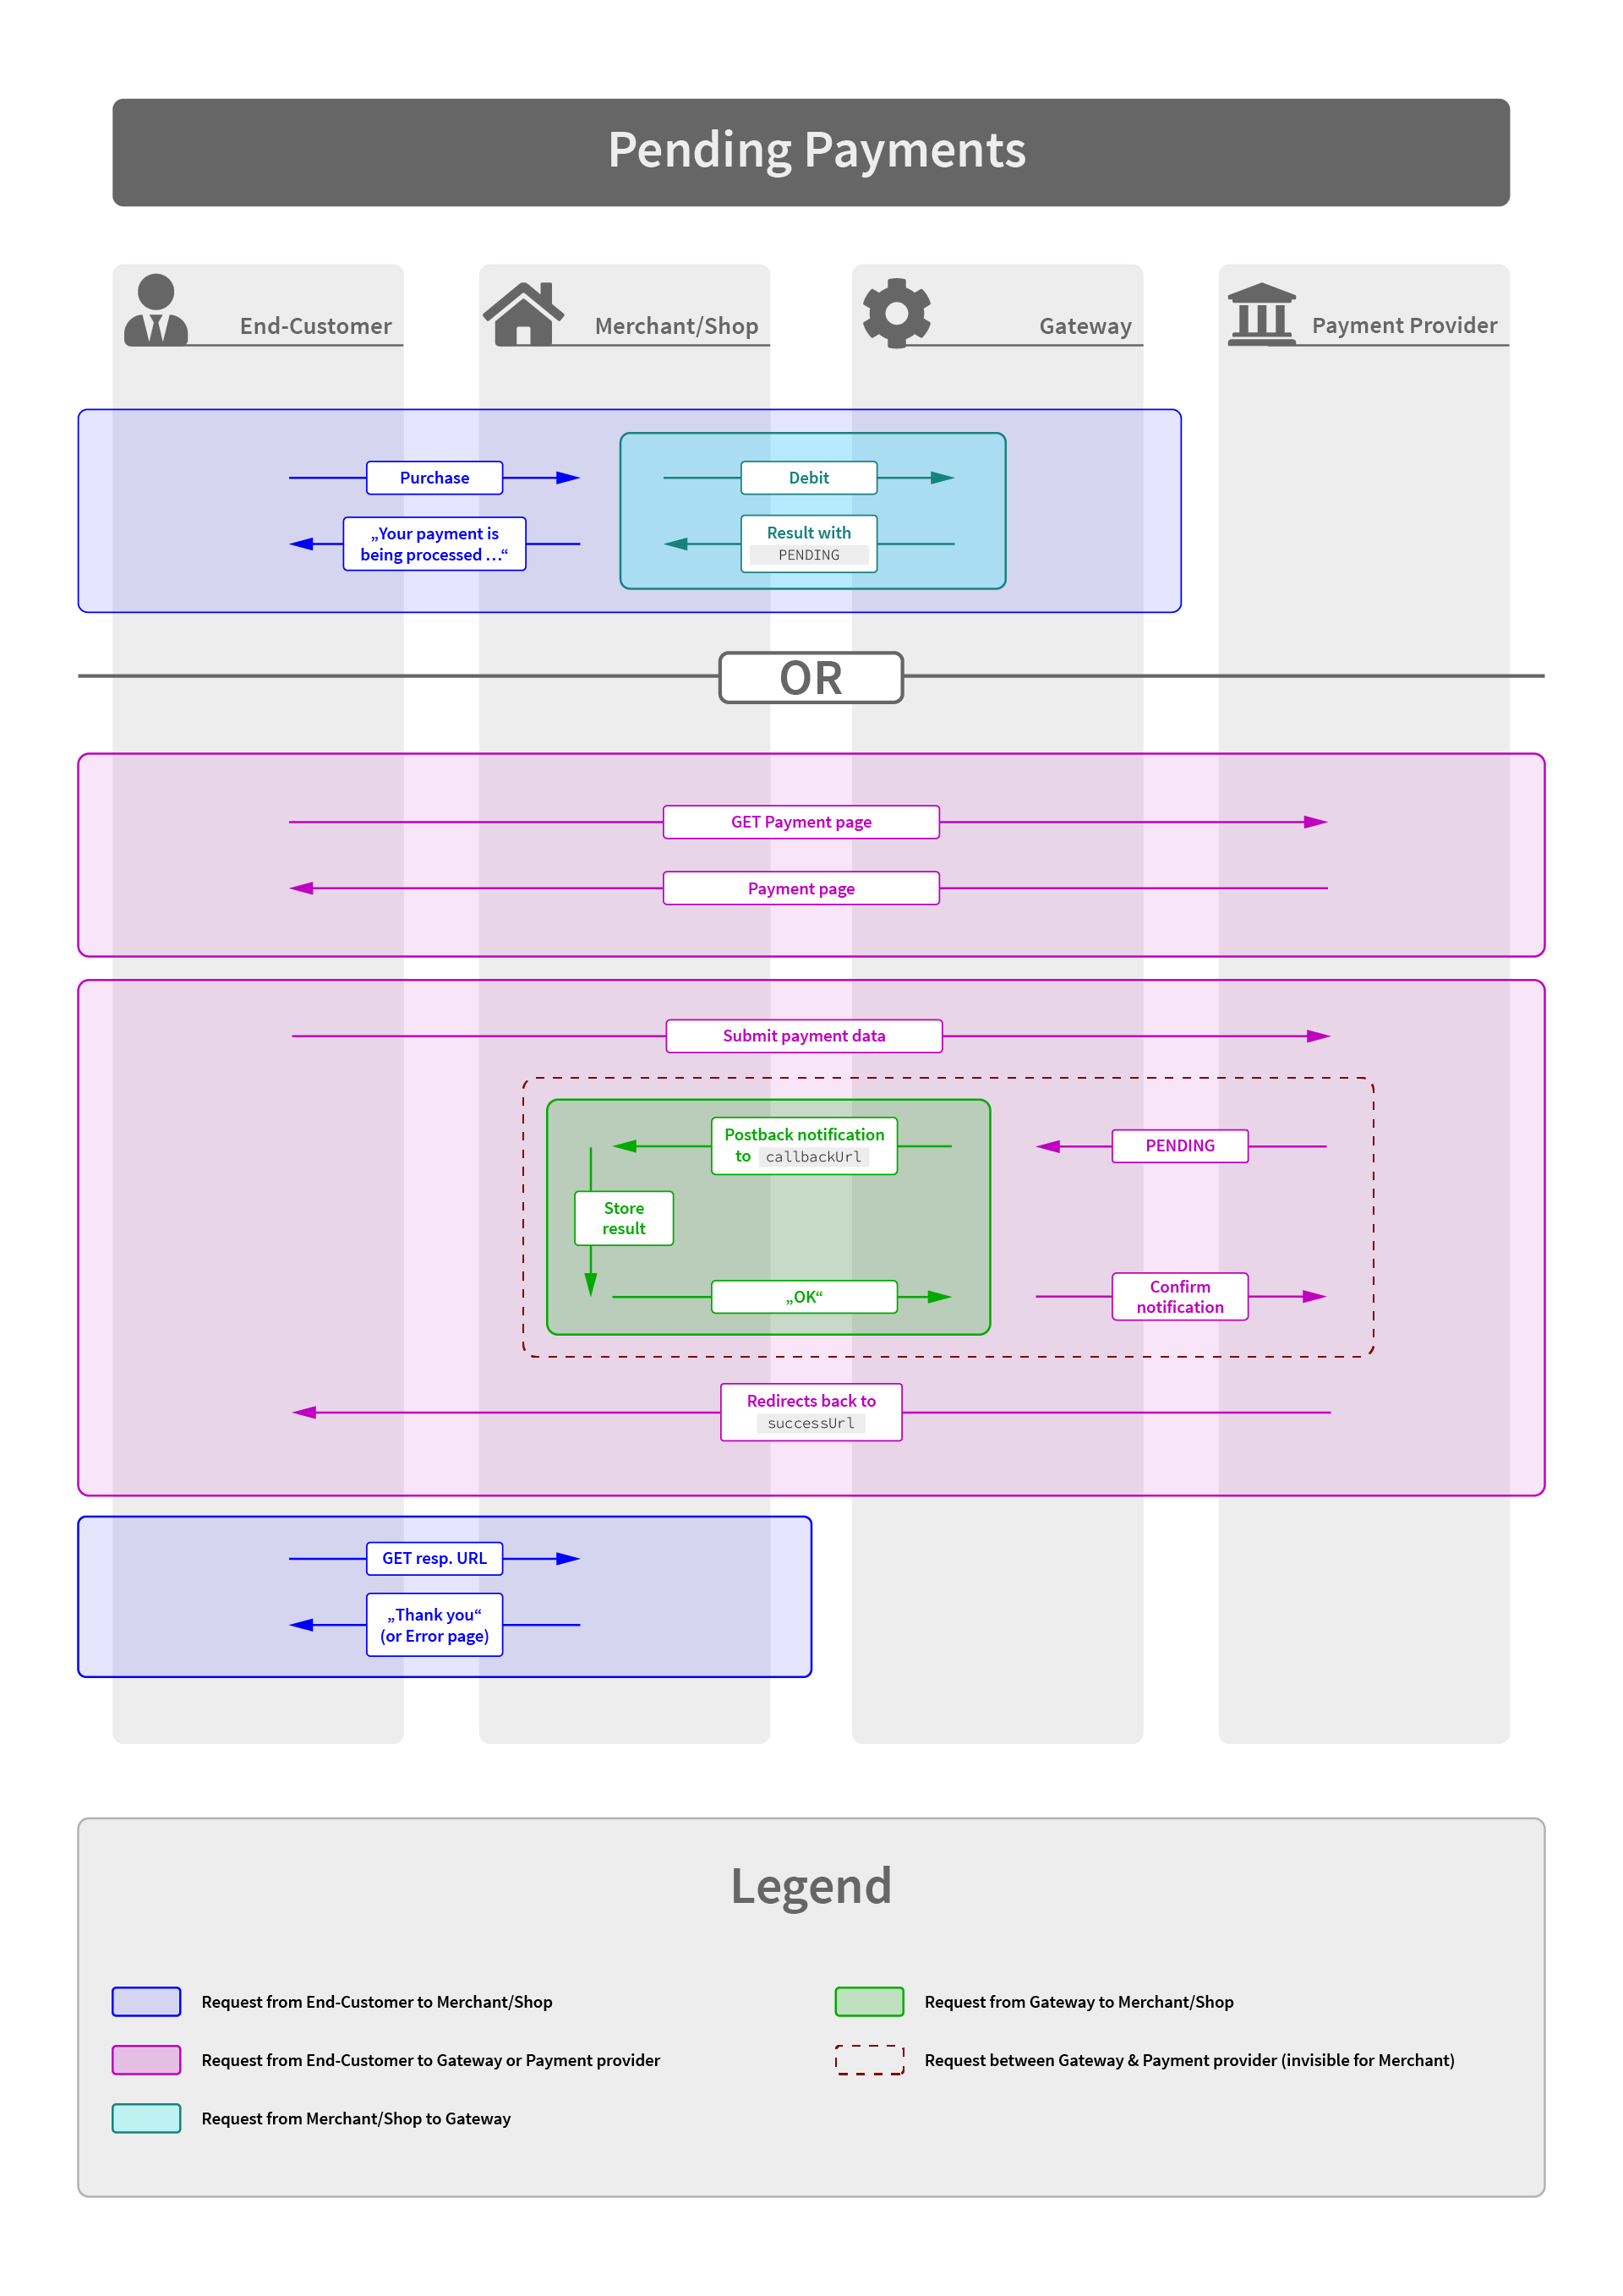
For every payment reaching a final status (successful or erroneous), the Gateway sends a notification to the callback URL defined in the transaction request.
Depending on the payment method this can either happen immediately or can take up to several days.
Your system must respond to this request with a HTTP status code "200" and the content "OK". If your response differs, the Gateway will continue to send the notification in increasing intervals.
Additionally the Gateway will also send a notification in case of any new follow up transactions or transaction status changes.
See the API Reference Documentation for detailed information about the notification XML.
Error Codes
Transactions which fail will always return an error code and an error message.
The error codes are structured in various groups, reflecting the phase when an error occurred.
General Errors & Validation Errors
| Code | Message | Description |
|---|---|---|
| 1000 | Request failed | Some fundamental error in your request |
| 1001 | Invalid response | The upstream system responded with an unknown response |
| 1002 | Invalid request data | Request data are malformed or missing |
| 1003 | Processing error | Transaction could not be processed |
| 1004 | Invalid signature | The request signature you provided was wrong |
| 1005 | Invalid XML | The XML you provided was malformed or invalid |
| 1006 | Logical error | Preconditions failed, e.g. capture on a failed authorize. |
| 1007 | Invalid configuration | Something is wrong your configuration, please contact your integration engineer |
| 1008 | Unexpected system error | As said |
| 1009 | Too many requests | Rate limit has been exceeded |
| 9999 | Unknown error | We received an error which is not (yet) mapped to a better error code |
Payment Errors
| Code | Message | Description |
|---|---|---|
| 2001 | Account closed externally | The customer cancelled permission for his payment instrument externally |
| 2002 | User cancelled | Transaction was cancelled by customer |
| 2003 | Transaction declined | Transaction declined by upstream system/bank |
| 2004 | Quota regulation | Some limit reached |
| 2005 | Transaction expired | Customer took to long to submit his payment info |
| 2006 | Insufficient funds | Card limit reached |
| 2007 | Incorrect payment info | . |
| 2008 | Invalid card | Card is invalid |
| 2009 | Expired card | |
| 2010 | Fraudulent card | |
| 2011 | Unsupported card | |
| 2012 | Transaction cancelled | |
| 2013 | Risk check block | |
| 2014 | Pickup card | |
| 2015 | Lost card | Card is claimed as lost |
| 2016 | Stolen card | |
| 2017 | IBAN invalid | |
| 2018 | BIC invalid | |
| 2019 | Customer data invalid | |
| 2020 | CVV required | |
| 2021 | 3D-Secure Verification failed |
Status API Errors
| Code | Message | Description |
|---|---|---|
| 8001 | Transaction not found | No transaction was found for this specific connector determined by the apiKey |
Schedule API Errors
| Code | Message | Description |
|---|---|---|
| 7001 | schedule request is invalid | |
| 7002 | schedule request failed | |
| 7005 | scheduleAction is not valid | |
| 7010 | registrationId is required | |
| 7020 | registrationId is not valid | |
| 7030 | reference transaction not a register | The registrationId must point to a register or a debit-with-register or a preauthorize-with-register |
| 7035 | initial transaction is not a register | The transaction for starting a schedule must be a register, a debit-with-register or a preauthorize-with-register |
| 7036 | invalid initial period | The period between the initial and second transaction must be greater than 24 hours |
| 7040 | The scheduleId is not valid or does not match to the connector | |
| 7050 | The startDateTime is invalid or older than 24 hours | |
| 7060 | The continueDateTime is invalid or older than 24 hours | |
| 7070 | The status of the schedule is not valid for the requested operation |
Network Errors
| Code | Message | Description |
|---|---|---|
| 3001 | Timeout | |
| 3002 | Not Allowed | |
| 3003 | Temporary unavailable | |
| 3004 | Duplicate transaction ID | |
| 3005 | Communication error |
Post-Processing Errors
| Code | Message | Description |
|---|---|---|
| 4001 | Chargeback reverted | Chargeback was reverted |
| 4002 | Payment dispute | A dispute was filed, see the upstream system (e.g. PayPal) for details |
payment.js Javascript Integration
With the payment.js integration you can securely accept card payments and integrate card number and CVV collection directly into your shop website without the need for redirecting to a separate payment form. The payment.js library renders 2 separate iFrames for card number and CVV/CVC in your checkout page. This reduces your PCI-DSS scope to as low as it can get (PCI-DSS SAQ-A).
As a result of the JavaScript flow, you will receive a transactionToken, identifying the
customer's card, which you pass to the Transaction API request.
Step-By-Step Guide
1. On top of your HTML page (either in HEAD or directly after BODY), include the payment.1.2.min.js as shown here:
<script data-main="payment-js" src="https://gateway.tillpayments.com/js/integrated/payment.1.2.min.js"></script>
2. Build the payment form using inputs for all data, except card number and CVV/CVC code. For those two just build a DIV element with an ID, and provide these IDs to the payment.js init call. Furthermore you will want to add a hidden field for the transaction token you'll get from payment.js.
For successful payment processing, at least the following fields are required:
- Card Holder (or separate fields for First name & Last name)
- Expiration Month
- Expiration Year
<form id="payment_form" method="POST" action="someScript.php" onsubmit="interceptSubmit(); return false;">
    <input type="hidden" name="transaction_token" id="transaction_token" />
    <div>
        <label for="first_name">First name</label>
        <input type="text" id="first_name" name="first_name" />
    </div>
    <div>
        <label for="last_name">Last name</label>
        <input type="text" id="last_name" name="last_name" />
    </div>
<!-- OR -->
    <div>
        <label for="card_holder">Card holder</label>
        <input type="text" id="card_holder" name="card_holder" />
    </div>
    <div>
        <label for="number_div">Card number</label>
        <div id="number_div" style="height: 35px; width: 200px;"></div>
    </div>
    <div>
        <label for="cvv_div">CVV</label>
        <div id="cvv_div" style="height: 35px; width: 200px;"></div>
    </div>

    <div>
        <label for="exp_month">Month</label>
        <input type="text" id="exp_month" name="exp_month" />
    </div>
    <div>
        <label for="exp_year">Year</label>
        <input type="text" id="exp_year" name="exp_year" />
    </div>
    <div>
        <label for="email">Email</label>
        <input type="text" id="email" name="email" />
    </div>
    <div>
        <input type="submit" value="Submit" />
    </div>
</form>
3. Initialize the Payment.js library by instantiating a PaymentJs object, and call init() on it. The init method expects the connector's public integration key, id of div containing the credit card number, id of the CVV div, and a callback function as parameters. The callback function will receive the PaymentJs object, and you should call any further methods (formatting, event handlers) directly there (see Method reference).
<script type="text/javascript">
    var payment = new PaymentJs();
    payment.init('public-integration-key', 'number_div', 'cvv_div', function(payment) {
        payment.setNumberStyle({
            'border': '1px solid red',
            'width': '150px'
        });
        payment.setCvvStyle({ ... });
        payment.numberOn('input', function(data) {
            alert('A number was entered');
        })
    });
</script>
4. Once the user submits the form, you must intercept the submit event and call Payment.js' tokenize
method, passing the additional data, a success callback and an error callback function.
The success callback receives the transaction token as string, you should store it and transmit it to your
server together with the rest of the form. Additional data about the card itself will also be passed in the
success callback.
The error callback function will receive an array with error objects, containing field name and error
message.
/*
 This example assumes you have jQuery loaded for accessing DOM elements
*/

function interceptSubmit() {
    var data = {
        first_name: $('#first_name').val(),
        last_name: $('#last_name').val(),
// OR   card_holder: $('#card_holder').val(),
        month: $('#exp_month').val(),
        year: $('#exp_year').val(),
        email: $('#email').val()
    };
    payment.tokenize(
        data, //additional data, MUST include card_holder (or first_name & last_name), month and year
        function(token, cardData) { //success callback function
            $('#transaction_token').val(token); //store the transaction token
            $('#payment_form').get(0).submit(); //submit the form
        },
        function(errors) { //error callback function
            alert('Errors occurred');
            //render error information here
        }
    );
}
//error example
[
  {
    "attribute":"first_name",
    "key":"errors.blank",
    "message":"First name can't be blank"
  }
]
5. You can now call the Transaction API with the transaction token you acquired.
CVV Refreshing
If you already have tokenized a card and stored it via a Register or Debit/Preauthorize with Register transaction, all subsequent transaction will not pass CVC/CVV code to the acquiring bank, because the verification code must not be stored due to PCI regulations.
If you still want to perform card-on-file transactions with CVC/CVV code, you have to present the CVC/CVV input field to the customer again.
For refreshing the CVV you must have the referenceId of the initial transaction stored in your
customer details.
Furthermore we recommend to store the last 4 digits of the card to let your customer know, which card will
be used for the payment.
Note: CVV Refresh call is not enabled for the dummy adapter
Use the CVV Refresh call as following:
1. On top of your HTML page (either in HEAD or directly after BODY), include the payment.1.2.min.js as shown here:
<script data-main="payment-js" src="https://gateway.tillpayments.com/js/integrated/payment.1.2.min.js"></script>
2. Build the payment form providing a DIV element with an ID for the CVV/CVC code input field.
<form id="payment_form" method="POST" action="someScript.php" onsubmit="interceptSubmit(); return false;">
    <div>
        <h1>Payment</h1>
        <p>
            Your purchase will be made with your stored credit card <b>**** **** **** 1111</b>
        </p>
    </div>
    <div>
        <label for="cvv_div">CVV</label>
        <div id="cvv_div" style="height: 35px; width: 200px;"></div>
    </div>
    <div>
        <input type="submit" value="Submit" />
    </div>
</form>
3. Initialize the Payment.js library by instantiating an PaymentJs object, and call initCvvRefresh() on it. The method expects the connector's public integration key, referenceId of the initial transaction which was used to store the card, id of the CVV div and a callback function as parameters. The callback function will receive the PaymentJs object, and you should call any further methods (formatting, event handlers) directly there (see Method reference).
<script type="text/javascript">
    var payment = new PaymentJs();
    payment.initCvvRefresh('public-integration-key', 'referenceTransactionId', 'cvv_div', function(payment) {
        payment.setCvvStyle({
            'border': '1px solid red',
            'width': '75px'
        });
        payment.cvvOn('input', function(data) {
            alert('A number was entered');
        });
    });
</script>
4. Once the user submits the form, you must intercept the submit event and call Payment.js' refreshCvv
method, passing a success callback and an error callback function.
The success callback will be called once the CVV was successfully updated for the card.
The error callback function will receive an array with error objects, containing field name and error
message.
/*
 This example assumes you have jQuery loaded for accessing DOM elements
*/

function interceptSubmit() {
    payment.refreshCvv(
        function() { //success callback function
            $('#payment_form').get(0).submit(); //submit the form
        },
        function(errors) { //error callback function
            alert('Errors occured');
            //render error information here (see list of error codes below)
        }
    );
}
//error example
[
  {
      "attribute": "cvv",
      "key": "errors.blank",
      "message": "CVV code must not be empty"
  }
]
5. You can now call the Transaction API to perform the Debit/Preauthorize with CVV present.
payment.js Error codes
- Invalid Integration Key
                {
                'attribute': 'integration_key',
                'key': 'errors.configuration',
                'message': 'Invalid Integration Key'
                }
- System Error
{
                'attribute': 'integration_key',
                'key': 'errors.system',
                'message': 'System error occurred, please retry'
                }
- Card number empty
{
                'attribute': 'number',
                'key': 'errors.blank',
                'message': 'Card number must not be empty'
                }
- CVV/CVC Code empty
{
                'attribute': 'cvv',
                'key': 'errors.blank',
                'message': 'CVV code must not be empty'
                }
- Invalid card number
{
                'attribute': 'number',
                'key': 'errors.invalid',
                'message': 'Invalid card number'
                }
- Invalid CVV/CVC
{
                'attribute': 'cvv',
                'key': 'errors.invalid',
                'message': 'Invalid CVV code'
                }
- Expiration month empty
{
                attribute: "month",
                key: "errors.blank",
                message: "Expiration month must not be empty"
                }
- Expiration month invalid
{
                attribute: "month",
                key: "errors.invalid",
                message: "Invalid expiration month"
                }
- Expiration year empty
{
                attribute: "year",
                key: "errors.blank",
                message: "Expiration year must not be empty"
                }
- Expiration year invalid
{
                attribute: "year",
                key: "errors.invalid",
                message: "Invalid expiration year"
                }
- Card expired
{
                'attribute': 'year',
                'key': 'errors.expired',
                'message': 'Card expired'
                }
- Card holder empty
{
                attribute: "card_holder",
                key: "errors.blank",
                message: "Card holder must not be empty"
                }
- First name empty
{
                attribute: "first_name",
                key: "errors.blank",
                message: "First name must not be empty"
                }
- Last name empty
{
                attribute: "last_name",
                key: "errors.blank",
                message: "Last name must not be empty"
                }
Method reference
PaymentJs.init(publicIntegrationKey, numberDivId, cvvDivId, completeCallback)
Initializes the PaymentJs object, pass the connector's public integration key (provided to you together with your credentials), the ID of the DIVs which will contain the number and CVV code, and a completeCallback function. This function will receive the PaymentJs object as first argument.
PaymentJs.initCvvRefresh(publicIntegrationKey, referenceTransactionId, cvvDivId,
                    completeCallback)
Initializes the PaymentJs object, pass the connector's public integration key (provided to you together with your credentials), the referenced transaction ID, the ID of the DIV which will contain the CVV code, and a completeCallback function. This function will receive the PaymentJs object as first argument.
PaymentJs.tokenize(additionalData, successCallback, errorCallback)
This submits the sensitive card information to the vaulting server.
additionalData is an object, may containing the following keys: first_name, last_name, month, year, email, phone_number, company, address1, zip, city, state, country
successCallback(token, cardData) will be called upon completion, receiving the token (as string) as first argument, and additional card data as second argument
Example card data
{
    "card_type": "visa",
    "full_name": "John Smith",
    "first_six_digits": 123456,
    "last_four_digits": "1234",
    "month": 1,
    "year": 2020,
    fingerprint: "46f7adfeb0a123fb8fcbfasdf6171asd6b3dfas44834c"
}
Possible card_type values are: amex, diners, discover,
jcb, maestro, mastercard, uatp, unionpay,
visa, visa_electron
errorCallback is called if an error occurs, containing error information (see above).
PaymentJs.refreshCvv(successCallback, errorCallback)
This submits the CVC/CVV code to the vaulting server.
successCallback will be called upon successful completion
errorCallback is called if an error occurs, containing error information (see above).
PaymentJs.initRiskScript(options, completeCallback)
Initialize Risk Scripts required for certain types of risk checks like the Kount risk check.
The first parameter should be an object including the type, e.g.
"{type:'kount'}",
completeCallback will be called upon successful completion
PaymentJs.setNumberStyle(styleObject)
Sets the style of the number field. The styleObject parameters should be an object with css properties, e.g.
{
    "border-color": "red",
    "font-size": "10px"
}
PaymentJs.setCvvStyle(styleObject)
Sets the style of the CVV field, for formatting see method above.
PaymentJs.setNumberPlaceholder(placeholderText)
Sets the placeholder text for the number input field
PaymentJs.setCvvPlaceholder(placeholderText)
Sets the placeholder text for the CVV input field
PaymentJs.numberOn(event, callbackFunction)
PaymentJs.cvvOn(event, callbackFunction)
Attach an event listener for the number or CVV input field, respectively. The callbackFunction will receive data about the event, e.g.
Data object
{
    "cardType": "visa",
    "cvvLength": 3,
    "numberLength": 12,
    "validCvv": true,
    "validNumber": true
}
Possible cardType values are: amex, diners, discover, jcb,
maestro, mastercard, uatp, unionpay, visa,
visa_electron
For details see event listening
PaymentJs.setRequireCardHolder(boolean)
With this you can disable the requirement of passing a card holder name within the
additionalData object
Deprecated methods
PaymentJs.onNumberInput(callbackFunction)
PaymentJs.onCvvInput(callbackFunction)
Both functions are deprecated in favor of PaymentJs.numberOn('input', eventHandler)
and PaymentJs.cvvOn('input', eventHandler), respectively.
Event listening
Both, number and CVV support listening for the following events:
inputfocusandblurmouseoverandmouseoutenterandesctabandshift-tab
For all events, the callback function will receive a data object.
var payment = new PaymentJs();
payment.init('public-integration-key', 'number_div', 'cvv_div', function(payment) {
  payment.numberOn('input', function(data) {
    // Handle input event
    console.log(data);
  });

  payment.numberOn('focus', function(data) {
    // Handle focus event
  });
});
Example output:
{
    "cardType": "visa",
    "cvvLength": 3,
    "numberLength": 12,
    "validCvv": true,
    "validNumber": true
}
Possible cardType values are: amex, diners, discover, jcb,
maestro, mastercard, uatp, unionpay, visa,
visa_electron
Advanced form styling
Using PaymentJs.setNumberStyle()/PaymentJs.setCvvStyle() in
combination with event listening allows styling the input fields similar to the
rest of your forms.
While the PaymentJs provides the most seamless integration for a shop, it has one limitation due to PCI requirements: external resources most not be loaded. Due to this constraint, it is not possible to load external fonts or background images.
var payment = new PaymentJs();
payment.init('public-integration-key', 'number_div', 'cvv_div', function(payment) {
  var numberFocused = false;
  var cvvFocused = false;
  var style = {
    'border': '3px solid gray',
  };
  var hoverStyle = {
    'border': '3px solid blue',
  };
  var focusStyle = {
    'border': '3px solid green',
  };

  // Set the initial style
  payment.setNumberStyle(style);
  payment.setCvvStyle(style);

  // Focus events
  payment.numberOn('focus', function() {
    numberFocused = true;
    payment.setNumberStyle(focusStyle);
  });
  payment.cvvOn('focus', function() {
    cvvFocused = true;
    payment.setCvvStyle(focusStyle);
  });

  // Blur events
  payment.numberOn('blur', function() {
    numberFocused = false;
    payment.setNumberStyle(style);
  });
  payment.cvvOn('blur', function() {
    cvvFocused = false;
    payment.setCvvStyle(style);
  });

  // Hover events
  payment.numberOn('mouseover', function() {
    // Don't override style if element is already focused
    if(! numberFocused) {
      payment.setNumberStyle(hoverStyle);
    }
  });
  payment.numberOn('mouseout', function() {
    // Don't override style if element is already focused
    if(! numberFocused) {
      payment.setNumberStyle(style);
    }
  });
  payment.cvvOn('mouseover', function() {
    // Don't override style if element is already focused
    if(! cvvFocused) {
      payment.setCvvStyle(hoverStyle);
    }
  });
  payment.cvvOn('mouseout', function() {
    // Don't override style if element is already focused
    if(! cvvFocused) {
      payment.setCvvStyle(style);
    }
  });
});
External Risk Scripts
Kount - Init risk script
Certain types of risk checks require to initialize risk scripts, e.g. the Kount risk check.
When using PaymentJS initialize the Kount Risk Script as follows:
<script type="text/javascript">

/**
 *  With using PaymentJS when the connector related to your "Public Integration Key" is
 *  not configured to init Kount automatically.
 *  If the "Automatic" is enabled no javascript steps are required at all for embedding Kount.
**/
    var payment = new PaymentJs("1.2");

    payment.init('public-integration-key', 'number_div', 'cvv_div', function(payment) {
        // ...

        payment.initRiskScript({type:'kount'});
    });

</script>
Without using PaymentJs initialize the Kount Risk Script as follows:
<script type="text/javascript" src="https://gateway.tillpayments.com/js/risk-scripts/kount-dc.min.js"></script>
<script type="text/javascript">

/**
 *  Initializing the Kount Risk Script without PaymentJS
 *
**/

    var kountMerchantId = 'kount-merchant-id';
    var kountTestMode = false; // using Kount sandbox or not
    var kountHandler = new KountDcHandler(kountMerchantId, kountTestMode);

    kountHandler.initKountDc(function(kountSessionId) {
        $('#hidden-kount-session-id').val(kountSessionId); // example with using jQuery
    });

</script>
Integration Guides
Seamless Card payments using payment.js
With this integration flow you collect & tokenize card data directly on your checkout page and send the transaction afterwards Server-to-Server.
Advantages:
- Seamless flow, native user experience
- Full control about look & feel
Disadvantages:
- Integration effort slightly higher as with hosted payment page
1. Collect card data
<html>
    <head>
        <title>Your checkout page</title>
    </head>
    <body>
        <script data-main="payment-js" src="https://gateway.tillpayments.com/js/integrated/payment.1.2.min.js"></script>

        <div>
            Checkout details:
            ...
        </div>
        <div>
            Please enter your card details:
        </div>
        <form id="payment_form" method="POST" action="/path/to/your/yourPaymentHandler" onsubmit="interceptSubmit(); return false;">
            <!-- add additional fields for your internal processing if necessary -->
            <input type="hidden" name="transaction_token" id="transaction_token" />
            <div>
                <label for="card_holder">Card holder</label>
                <input type="text" id="card_holder" name="card_holder" />
            </div>
            <div>
                <label for="number_div">Card number</label>
                <div id="number_div" style="height: 35px; width: 200px;"></div>
            </div>
            <div>
                <label for="cvv_div">CVV</label>
                <div id="cvv_div" style="height: 35px; width: 200px;"></div>
            </div>

            <div>
                <label for="exp_month">Expiration Month</label>
                <input type="text" id="exp_month" name="exp_month" />
            </div>
            <div>
                <label for="exp_year">Expiration Year</label>
                <input type="text" id="exp_year" name="exp_year" />
            </div>
            <div>
                <input type="submit" value="Submit" />
            </div>
        </form>


        <script type="text/javascript">
            var payment = new PaymentJs();
            payment.init('public-integration-key', 'number_div', 'cvv_div', function(payment) {
                payment.setNumberStyle({
                    'border': '1px solid black',
                    'width': '150px'
                });
                payment.setCvvStyle({ ... });
                payment.numberOn('input', function(data) {
                    alert('A number was entered');
                })
            });

            function interceptSubmit() {
                var data = {
                    card_holder: $('#card_holder').val(),
                    month: $('#exp_month').val(),
                    year: $('#exp_year').val()
                };
                payment.tokenize(
                    data, //additional data, MUST include card_holder (or first_name & last_name), month and year
                    function(token, cardData) { //success callback function
                        $('#transaction_token').val(token); //store the transaction token
                        $('#payment_form').get(0).submit(); //submit the form
                    },
                    function(errors) { //error callback function
                        alert('Errors occurred');
                        //render error information here
                    }
                );
            }
        </script>
    <body>
</html>
Integrate payment.js library in your Checkout page to collect and tokenize customer's card details.
The payment.js library renders 2 separate iFrames for card number and CVV/CVC in your checkout page. This reduces your PCI-DSS scope to as low as it can get (PCI-DSS SAQ-A).
As a result of the JavaScript flow, you will receive a transactionToken, identifying the
customer's card, which you pass to the Transaction API request.
See more details here: payment.js Documentation.
2. Send transaction
POST https://gateway.fishbulbpay.com.au/api/transaction/debit
Authorization: "Bearer {your access token}"
{
  "mode": "LIVE or SANDBOX",
  "merchantTransactionId": "2019-09-02-0001",
  "transactionToken": "TOKEN_FROM_PAYMENTJS"
  "withRegister": "boolean"
  "referenceUuid": "reference uuid of the card's first payment",
  "merchantMetaData": "merchantRelevantData",
  "amount": "9.99",
  "currency": "EUR",
  "callbackUrl": "http://example.com/callback",
  "description": "Example Product",
  "customer": {
    "identification": "c0001",
    "firstName": "John",
    "lastName": "Doe",
    "birthDate": "1990-10-10",
    "gender": "M",
    "billingAddress1": "Maple Street 1",
    "billingAddress2": "Syrup Street 2",
    "billingCity": "Victoria",
    "billingPostcode": "V8W",
    "billingState": "British Columbia",
    "billingCountry": "CA",
    "billingPhone": "1234567890",
    "shippingFirstName": "John",
    "shippingLastName": "Doe",
    "shippingCompany": "Big Company Inc.",
    "shippingAddress1": "Yellow alley 3",
    "shippingAddress2": "Yellow alley 4",
    "shippingCity": "Victoria",
    "shippingPostcode": "V8W",
    "shippingState": "British Columbia",
    "shippingCountry": "CA",
    "shippingPhone": "1234567890",
    "company": "John's Maple Syrup",
    "email": "john@example.com",
    "emailVerified": false,
    "ipAddress": "127.0.0.1",
    "nationalId": "1234"
  },
  "language": "en"
}
In this step you will now send a transaction request from your backend server to our server.
Depending on your business model, this can either be a Debit or a Refund
request.
The mandatory fields for this request, especially the end-customer data, greatly depends on the configuration of your merchant account. As a rule of thumb we would recommend to send as much available data as possible, to receive the most benefits from risk checks and any other validations.
Details about the format and requirements about the transaction request can be found here:
3. Handle asynchronous postback notification
POST http://yourapp.com/callback
Date: Mon, 01 Jan 2018 11:01:36 GMT
Content-Type: application/json; charset=utf-8
{
    "result": "OK",
    "uuid": "abcde12345abcde12345",
    "merchantTransactionId": "auto-2019-09-02-0012",
    "purchaseId": "20191210-abcde12345abcde12345",
    "transactionType": "DEBIT",
    "paymentMethod": "Creditcard",
    "amount": "9.99",
    "currency": "EUR",
    "returnData": {
        "cardData": {
            "type": "visa",
            "cardHolder": "John Doe",
            "expiryMonth": 12,
            "expiryYear": 2020,
            "firstSixDigits": "123456",
            "lastFourDigits": "4321",
            "fingerprint": "s0mEF1n6eRpr1n7",
            "threeDSecure": "OFF",
            "binBrand": "VISA",
            "binBank": "SOME BANK",
            "binCountry": "US"
        }
    }
}
In almost any case the Gateway will you send a postback notification about the transaction outcome.
Only if your request could not be processed at all, there will be no postback notification, only a response with the error description.
E.g. due to invalid request format, invalid authentication etc.
The Postback Notification contains the result of the transaction and optionally additional data, such as card details or customer information.